|
The Problem
A problem with all A7V versions (even up to A7V333) that unfortunately
is not uncommon, is malfunction after flashing BIOSes. This means
that after a seemingly successful flash the PC simply won't boot,
it would just sit there with a black screen.
This might be caused by either
- A bad flash (meaning the BIOS contents are corrupted,
mostly when flashing from windows - which is a bad idea in many
people's opinion.)
- Bad CMOS settings (sometimes this can be cured by clearing
the CMOS, but sometimes you have to insert another CPU, go to
jumper or jumperless mode, set mismatching or undocumented switch
settings, or you simply can't get get it to work again)
- In the special case of the ASUS A7V Series (from the
classic A7V to the A7V333) there have been a lot of cases in the
forum
where flashing seemed to have been OK, but after reboot
there was nothing but a black screen. While some of these
cases could be resolved by clearing the CMOS, setting the multiplier
or frequency DIP switches to undocumented settings or changing
the CPU, many had to have their BIOS reprogrammed or the mainboard
exchanged by their dealer.
If you have a non-socketed BIOS (e.g.. it is soldered onto the
mainboard) then you are out of luck. All you can do is get your
mainboard exchanged. Some A7V266, for example, were delivered with
a soldered BIOS chip.
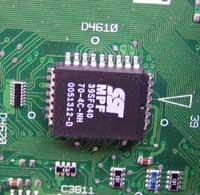
PLCC BIOS Soldered
onto the mainboard
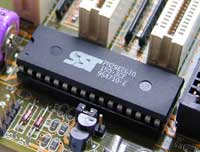
Socketed DIP
BIOS
If it is socketed, you have some chances to recover:
- Buy or borrow an other or new BIOS chip with a working
BIOS version
- Have your BIOS chip reprogrammed by a electronics shop
or service
- Do a "hot flash" with your bad BIOS chip in
another PC
There are several ways how mainboard manufacturers try to help
you recover after BIOS flashing has failed:
- GigaByte has the DualBIOS, which lets you switch between
two BIOSes. If one is malfunctioning, the working one can be copied
to the non-working one. While this is really clever and handy,
a second BIOS chip (or a bigger one) costs money...
- AOpen basically had the same technology with their DieHard
BIOS, simply a second socket for a BIOS chip.
- MSI had the SafeBIOS 810, where a single BIOS chip housed
two bios images. If one was corrupted, the other one could be
activated. Operation and idea were similar to the DualBIOS.
- Fujitsu Siemens Computers and some Intel mainboards have a Boot
Block BIOS (Recovery BIOS). The Boot Block is an area in
the Flash memory that is never ever touched and thus remains intact
even after a failed flash. It contains a "mini-BIOS"
which can do a minimal initialization and can boot from a diskette.
There is a switch on the mainboard which lets you activate the
Boot Block. So all you have to do is flip the switch and insert
the BIOS flash bootdisk that you have previously downloaded from
the Internet, the Boot Block then re-flashes the BIOS from the
image on the disk and resets the CMOS settings to default.
- Most AWARD BIOSes (including the A7V ones) have such
a Boot Block, too. Unfortunately, the flash tools by ASUS
and many others are not really clever - if the new BIOS contains
a new Boot Block then it erases the complete BIOS and reprograms
it - including the boot block. If something goes wrong during
flash you are stranded without any means of recovery. Additionally,
there is no switch with which you could manually activate this
boot block. The BIOS itself has to determine if it is corrupt,
and if yes, has to initiate the recovery procedure.
Actually I only heared from very few people who have managed to
recover using the standard AWARD BIOS Boot Block. Most people
with A7Vs had their boards simply sitting there doing nothing.
If the boot block had worked, the board would have tried to access
drive A: ...
Browsing newsgroups I saw numerous people mention a device called
RD1
BIOS Savior.
EksitData,
a Swedish online shop, was so friendly to send one of these for
testing. Actually they did so quite a long time ago, but only
now I had enough time to finish this article. Sorry to you and to
EksitData that it took so very long.
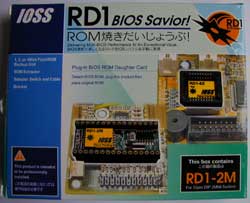
The RD1 Package
The RD1 basically is a second BIOS chip. You remove your chip,
insert the RD1, and then insert your chip on top of the RD1. Via
a switch (in a slot cover) you can choose which BIOS chip is used.
The RD1 is available in 6 different favors, depending on your BIOS
chip.
| Product |
BIOS Size |
Packaging |
Fits these Mainboards |
| RD1-1M |
1Mbit |
DIP |
some 486, older Pentium |
| RD1-2M |
2Mbit |
DIP |
A7V, A7V133 and many slightly older Pentium to
Pentium III, Athlon etc. |
| RD1-PL |
2Mbit |
PLCC |
A7V266 / A7V333 and many other recent Mainboards |
| RD1-LPC2 |
2Mbit |
PLCC |
As above, but for "SST49LF020" or "WINBOND
49V002" |
| RD1-8X |
4Mbit |
PLCC |
Intel 8xx Chipset FirmwareHUB |
| RD1-8X2 |
2Mbit |
PLCC |
Intel 8xx Chipset FirmwareHUB |
>> Next Page
Page1: The Problem
Page2: What you get / how it works
Page3: Testing / Conclusion
Page4: Addendum: Testing Procedure
|